1. How to register yourself online for attending conference?
The steps are as follows:
1.1: Type your conference URL link for example www.mypadacademia.com/iccp2016 or like this (The links are for example, and your conference link may vary) into a browser and click enter to visit the site.
1.2: Click " Registration" button.
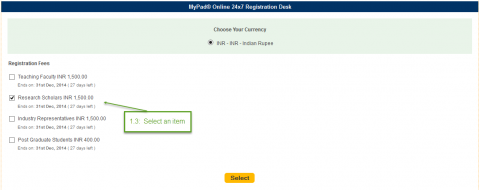
1.3: Select an item: Place the cursor over the square box which is seen before an item name and click on it. The system will be showing a black tick-mark inside the square box. This means the specific item is selected.
1.4: Click Select button. Once The following message "Your Buy List item(s) is updated Click here to Checkout" will be displayed.
1.5: Click "Click Register/PlaceOrder" button.
1.6: Click Checkout button.
* Skip to SECTION 2 if you already have an account or you have already signed up.
SECTION 1: Customer Information (New Account Creation) |

1.6.1: Enter your email address.
1.6.2: Enter your firstname.
1.6.3: Enter your lastname.
1.6.4: Enter your mobile number.
1.6.5: Enter your country.
1.6.6: Enter your password.
1.6.7: ReEnter your password.
1.6.8: Click "Sign Up" button.
Or login using Social Login as follow
1.7: Click "Social Login" button.
The new account details - (optional) is an optional section having fields to enter username, password, and confirm password. You can click New account details - (Optional) to expand it, and fill up the field.
SECTION 2: I have already signed up or I already have an account |
1.8: Click “Existing User” button.
Please see “How to log in to your account?”
2. How to enter your billing information while registering online for attending conference?
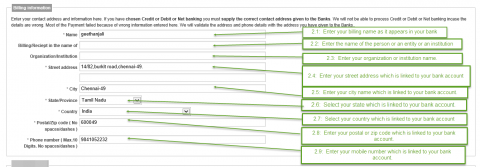
Please note that the billing information you enter in the billing information section should be the ones which are linked to your bank account.
To enter your billing information, follow the steps provided below:
2.1: Enter your billing name as it appears in your bank account.
2.2: Enter the name of the person or an entity or an institution, to which the bill is to be addressed, into Billing in the name of field. For example: If you are attending the conference representing a group, a person, a company or an institution, their corresponding names should be entered into Billing in the name of field.
2.3: Enter your organization or institution name.
2.4: Enter your street address which is linked to your bank account.
2.5: Enter your city name which is linked to your bank account.
2.6: Select your state which is linked to your bank account.
2.7: Select your country which is linked to your bank account.
2.8: Enter your postal or zip code which is linked to your bank account.
2.9: Enter your mobile number which is linked to your bank account.
3. How to select Payment Details?
There are 7 types of mode of payments available in the system.
Online Payment
It consists of three types of payments. They are credit card, debit card, and net banking.
Credit or Debit Card Payment
3.1: Click Online Payment.
3.2: Enter your comments.
3.3: Click “I agree with the terms above”: Place the cursor/mouse pointer over the square box which is seen before I agree with the terms above and click on it. The system will show a black tick-mark. This means you agree with the terms above.
3.4: Click BACK button to make changes to your Registration if necessary.
3.5: Click Review Order button,The following message “Your Registration is almost complete. Please review the details below and click 'Submit' if all the information is correct.
3.7: Click Submit Order button.
3.5: Select a card type: Place the cursor/mouse pointer over either one of the circle which is seen before each card type and click on it. The system will show a black bullet point. This means a specific card is selected.
3.6: Enter your sixteen digits credit or debit card number.
3.7: Select expiry date and year from Expiry Date dropdowns.
3.8: Enter the cvv number.
3.9: Enter the bank name of your credit or debit card.
3.10: Click PAY NOW. The system will be taking you to your own bank secured payment gateway page. Please proceed what the page says. The banks' secured payment gateway page may vary with each bank.
Net Banking
The steps are as follows:
3.1: Click “I agree with the terms above”: Place the cursor over the square box which is seen before I agree with the terms above and click on it. The system will show a black tick-mark. This means you agree with the terms above.
3.2: Click Online Payment.
3.3: Click Review Order. The following message “Your Registration is almost complete. Please review the details below and click 'Submit' if all the information is correct. You may use the 'Back' button to make changes to your Registration if necessary” will be displayed as shown below.
3.4: Click Net Banking. The system will be showing few popular banks with a circle before each bank to select and all other banks' name preloaded in Other Banks dropdown.
3.5: Click Submit Order.
3.6: Select your bank either in popular banks section if it is shown or from Other Banks dropdown.
3.7: Click PAY NOW. The system will be taking you to your own bank secured payment gateway page. Please proceed what the page says. The banks' secured payment gateway page may vary with each bank.
Cheque/Check
The steps are as follows:
3.1: Click “I agree with the terms above”: Place the cursor over the square box which is seen before I agree with the terms above and click on it. The system will show a black tick-mark. This means you agree with the terms above.
3.2: Click Cheque / Check. The system will be showing you details such as In favour of, Payable at, Due Date, and Address.
3.3: Click Review Order. The following message “Your Registration is almost complete. Please review the details below and click 'Submit' if all the information is correct. You may use the 'Back' button to make changes to your Registration if necessary” .
3.4: Click Submit Order. The following message “Your Registration is completed. Your Order number is (four digit numbers). If you have made the payment using online payment options, get your e-Pass at My ePass. An email has been sent confirming your order. In case you did not find it in your email inbox, check your SPAM folder. View your current order status and order history at My Orders” .
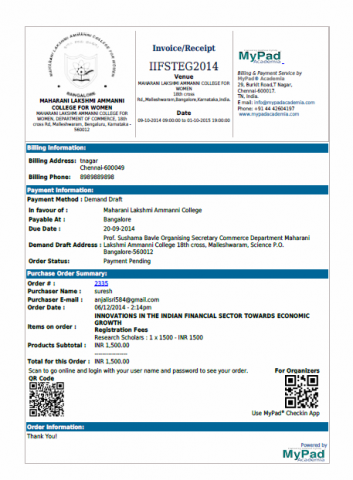
3.5: Click “Click to open a window with a printable invoice”. A new page showing your order details will be displayed.
3.6: Print the invoice copy.Refer 3.7 (Invoice Copy)
3.7: Attach the Cheque/Check along with the invoice copy and mail it to the organizer address.
Bank Transfer/Wired Transfer
The steps are as follows:
3.1: Click “I agree with the terms above”: Place the cursor over the square box which is seen before I agree with the terms above and click on it. The system will show a black tick-mark. This means you agree with the terms above.
3.2: Click Bank Transfer/Wired Transfer. The system will be showing organizer’s bank details such as Account Name, Account Number, Bank Name, etc.
3.3: Click Review Order. The following message “Your Registration is almost complete. Please review the details below and click 'Submit' if all the information is correct. You may use the 'Back' button to make changes to your Registration if necessary” .
3.4: Click Submit Order. The following message “Your Registration is completed. Your Order number is (four digit numbers). If you have made the payment using online payment options, get your e-Pass at My ePass. An email has been sent confirming your order. In case you did not find it in your email inbox, check your SPAM folder. View your current order status and order history at My Orders” will be displayed as shown below.
3.5: Click “Click to open a window with a printable invoice”. A new page showing your order details will be displayed .
3.6: Print the invoice copy. (Refer 3.7)
3.7: Need to know how it will be working from this point.
Demand Draft
They are as follows:
3.1: Click “I agree with the terms above”: Place the cursor over the square box which is seen before I agree with the terms above and click on it. The system will show a black tick-mark. This means you agree with the terms above.
3.2: Click Demand Draft. The system will be showing organizer’s bank details In favour of, Payable at, Due Date, and Address.
3.3: Click Review Order. The following message “Your Registration is almost complete. Please review the details below and click 'Submit' if all the information is correct. You may use the 'Back' button to make changes to your Registration if necessary” will be displayed .
3.4: Click Submit Order. The following message “Your Registration is completed. Your Order number is (four digit numbers). If you have made the payment using online payment options, get your e-Pass at My ePass. An email has been sent confirming your order. In case you did not find it in your email inbox, check your SPAM folder. View your current order status and order history at My Orders” will be displayed .
3.5: Click “Click to open a window with a printable invoice”. A new page showing your order details will be displayed ..
3.6: Print the invoice copy. (Refer 3.7)
3.7: Attach the Demand Draft along with the invoice copy and mail it to the organizer address.
Money Order/ Postal Order
The steps are as follows:
3.1: Click “I agree with the terms above”: Place the cursor over the square box which is seen before I agree with the terms above and click on it. The system will show a black tick-mark. This means you agree with the terms above.
3.2: Click Money Order. The system will be showing organizer’s details such as In favour of and Address.
3.3: Click Review Order. The following message “Your Registration is almost complete. Please review the details below and click 'Submit' if all the information is correct. You may use the 'Back' button to make changes to your Registration if necessary” will be displayed .
3.4: Click Submit Order. The following message “Your Registration is completed. Your Order number is (four digit numbers). If you have made the payment using online payment options, get your e-Pass at My ePass. An email has been sent confirming your order. In case you did not find it in your email inbox, check your SPAM folder. View your current order status and order history at My Orders” will be displayed .
3.5: Click “Click to open a window with a printable invoice”. A new page showing your order details will be displayed .
3.6: Print the invoice copy. (Refer 3.7)
3.7: Attach the Demand Draft along with the invoice copy and mail it to the organizer address.
Cash at Venue
The steps are as follows:
3.1: Click “I agree with the terms above”: Place the cursor over the square box which is seen before I agree with the terms above and click on it. The system will show a black tick-mark. This means you agree with the terms above.
3.2: Click Cash at Venue.
3.3: Click Review Order. The following message “Your Registration is almost complete. Please review the details below and click 'Submit' if all the information is correct. You may use the 'Back' button to make changes to your Registration if necessary” will be displayed .
3.4: Click Submit Order. The following message “Your Registration is completed. Your Order number is (four digit numbers). If you have made the payment using online payment options, get your e-Pass at My ePass. An email has been sent confirming your order. In case you did not find it in your email inbox, check your SPAM folder. View your current order status and order history at My Orders” will be displayed .
3.5: Print the invoice copy. (Refer 3.7)
3.6: Produce the invoice copy while paying cash at the Venue.
| 3.7 Invoice copy |


Sharing the process of
Submitted by Reviewer on Sun, 23/09/2018 - 18:21
Sharing the process of registration is so good for the people who do not know about it and want to get register. I see that the college paper review is good to guide people about this registration process.